- 您现在的位置:买卖IC网 > Sheet目录264 > YB216CWCKW01-N-JB (NKK Switches)SWITCH PUSHBUTTON SPDT 3A 125V
Panel Seal Pushbuttons
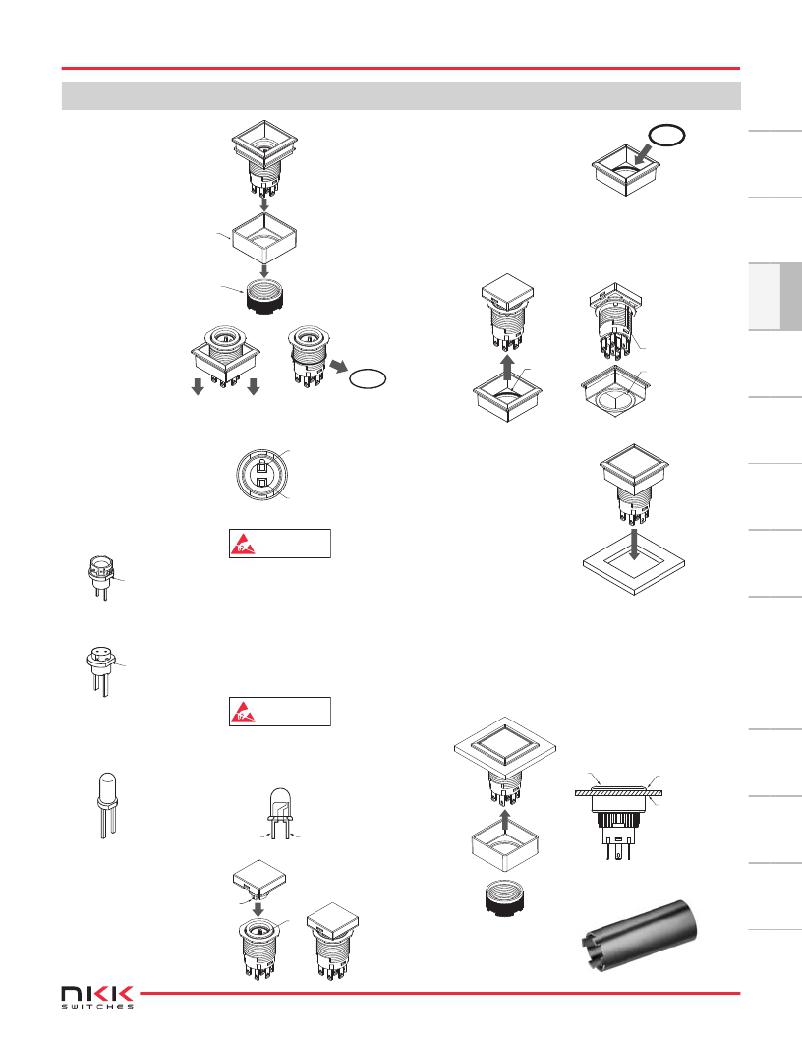
ASSEMBLY INSTRUCTIONS FOR SQUARE
Series YB2
1. Remove knurled
mounting nut.
5. Install the blue o-ring
which was removed
in step 2 at the inside
bottom of the bezel.
Blue O-ring
Bezel
Spacer
Knurled
Mounting Nut
6. Align tab inside of the bezel with keyway on housing and
bring bezel back into its original position.
Housing
D
2. Remove bezel
and blue o-ring
from housing.
Bezel
Blue O-ring
Blue O-ring
Bezel
Keyway
Tab
( –)
3. Install LED.
LEDs
AT634 & AT636
D-Flat
(+)
Part Number
This Side
Cathode
Socket (–)
Anode
Socket (+)
ATTENTION
ELECTROSTATIC
SENSITIVE DEVICES
Align D-flat on LED with Part Number
on switch for appropriate polarity and
insert LED into base.
7. Before installing into
panel, make sure that
the square gasket is
present at the back of
the bezel. Align keyway
on bezel with tab in
panel and push switch
all the way into the
panel.
Back of
Bezel
Panel
Bezel
LED AT628
D-Flat
Align D-flat on LED with Part Number
on switch for appropriate polarity and
insert LED into base.
8. Attach mounting nut behind panel and tighten. Make
sure that bezel and actuator fit properly and that there is
no space between bezel and panel. Do not overtighten.
Mounting torque: 0.785Nm (6.95 lb ? in) maximum.
( –)
(+)
LEDs AT625G,
AT631B,
AT632F
ATTENTION
ELECTROSTATIC
SENSITIVE DEVICES
The larger metal part within the LED
represents the cathode (–). Align LED
for appropriate polarity and insert LED
into base.
Optional socket wrench AT106 available.
Actuator
Bezel
Panel
(+)
( –)
Cathode ( –)
Anode (+)
Spacer
4. Align tabs (B) on both
sides of actuator with
the projections (A) inside
of the housing and push
actuator firmly down to
snap in.
B
Actuator
A
Housing
Knurled
Mounting Nut
AT106 Socket Wrench
www.nkk.com
D123
发布紧急采购,3分钟左右您将得到回复。
相关PDF资料
YB226CWSKW01-5F24-FB
SWITCH PUSHBUTTON DPDT 3A 125V
YB26WRKG01-5F05-JB
SWITCH PUSH DPDT 0.4VA 28V
YB26WSKG01-FB
SWITCH PUSH DPDT 0.4VA 28V
YC122-JR-0715RL
RES ARRAY 15 OHM 2 RES 0404
YC124-JR-07120KL
RES ARRAY 120K OHM 4 RES 0804
YC248-JR-0710RL
RES ARRAY 10 OHM 8 RES 1506
YC324-JK-072K2L
RES ARRAY 2.2K OHM 4 RES 2012
YE-2RB-A2
SWITCH PLUNGER SPST 25A SCREW
相关代理商/技术参数
YB216CWCPW01-5C-JS
功能描述:Pushbutton Switch SPDT Standard, Illuminated Panel Mount, Front 制造商:nkk switches 系列:YB2 包装:散装 零件状态:有效 类型:标准,发光式 电路:SPDT 开关功能:开-开 额定电流:3A(AC/DC) 额定电压 - AC:125V 额定电压 - DC:30V 致动器类型:圆形,按钮,平头 颜色 - 致动器/盖帽:银 照明类型,颜色:LED,红 照明电压(标称值):1.9 VDC 安装类型:前面板安装 端子类型:焊接,快速连接 - 0.110"(2.8mm) 侵入防护:IP65 - 防尘,耐水 特性:环氧树脂密封端子 面板开口尺寸:圆形 - 22.00mm 直径 工作温度:-25°C ~ 50°C 机械寿命:200,000 次循环 电气寿命:100,000 次循环 标准包装:1
YB216CWCPW01-5D-JS
制造商:NKK Switches 功能描述:SWITCH PUSHBUTTON SPDT 3A 125V
YB216CWCPW01-N-P
功能描述:按钮开关 SPDT ON ON, Round Chrome, 3A@125VAC,QC
RoHS:否 制造商:NKK Switches 触点形式:SPDT 开关功能:ON - ON 电流额定值:3 A 电压额定值 AC:250 V 电压额定值 DC:30 V 功率额定值: 安装风格:Panel 照明:Not Illuminated 照明颜色: IP 等级:IP 65 端接类型:Solder Lug 触点电镀:Silver 执行器:Round 盖颜色:Silver 封装: 可燃性等级:
YB216CWCSG01-5C-CB
制造商:NKK 制造商全称:Nihon Kaiheiki Industry Co. Ltd. 功能描述:22mm Panel Seal Pushbuttons
YB216CWCSG01-5C-JB
制造商:NKK 制造商全称:Nihon Kaiheiki Industry Co. Ltd. 功能描述:22mm Panel Seal Pushbuttons
YB216CWCSG01-5C-JS
制造商:NKK 制造商全称:Nihon Kaiheiki Industry Co. Ltd. 功能描述:22mm Panel Seal Pushbuttons
YB216CWCSG01-5D-CB
制造商:NKK 制造商全称:Nihon Kaiheiki Industry Co. Ltd. 功能描述:22mm Panel Seal Pushbuttons
YB216CWCSG01-5D-JB
制造商:NKK 制造商全称:Nihon Kaiheiki Industry Co. Ltd. 功能描述:22mm Panel Seal Pushbuttons
